|
在游戏开辟过程中,你大概必要一个主菜单,几个关卡和一个END的界面,怎样组织管理这些东西呢?
和其他游戏引擎类似,Cocos也使用了场景(Scene) 这个概念
试想象一部电影或是番剧,你不难发现它是被分解为差别场景或差别时间线的,这些部分就是一个又一个的场景
参考:https://www.cnblogs.com/NightFrost/p/11688854.html
场景的存储布局
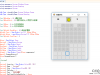
为了表明场景的布局,我们先不看我们过于简单的helloworld场景,看下面这个官方文档的场景:
这是一个主菜单场景,这个场景是由许多小的对象拼接而成,全部的对象组合在一起,形成了你看到的结果
场景是被渲染器(renderer)画出来的,渲染器负责渲染精灵和其它的对象进入屏幕,那渲染器怎么知道什么东西要渲染在后,什么东西要渲染在前呢?
答案是通过场景图(Scene Graph)实现
场景图(Scene Graph)
Cocos2d-x使用场景图(Scene Graph)这一数据布局来安场面景内渲染的对象,场景内全部的节点(Node)都包罗在一个树(tree)上:
Cocos2d-x使用 中序遍历,先遍历左子树,然后根节点,最后是右子树
中序遍历下图的节点,能得到 A, B, C, D, E, F, G, H, I 这样的序列
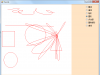
如今我们再看这个游戏场景:
分解这场景为5个部分
抽象成数据布局就是:
z-order
树上的每个元素都会存储一个z-order,z-order为负的元素,z-order为负的节点会被放置在左子树,非负的节点会被放在右子树,实际开辟的过程中,你可以按照恣意顺序添加对象,他们会按照你指定的 z-order 主动排序
在 Cocos2d-x 中,通过 Scene 的 addChild() 方法构建场景图 - <code>// Adds a child with the z-order of -2, that means
- // it goes to the "left" side of the tree (because it is negative)
- scene->addChild(title_node, -2);
- // When you don't specify the z-order, it will use 0
- scene->addChild(label_node);
- // Adds a child with the z-order of 1, that means
- // it goes to the "right" side of the tree (because it is positive)
- scene->addChild(sprite_node, 1);</code>
渲染时 z-order 值大的节点对象后绘制,值小的节点对象先绘制,假如两个节点对象的绘制范围有重叠,z-order 值大的大概会覆盖 z-order 值小的,这才实现了我们的需求
HelloWorld场景
如今我们回看我们运行出来的HelloWorld场景,而且详细到代码操作
场景中有一个我们本身的图片,一个关闭按钮,一个HelloWorld的字样,这些东西都是在HelloWorld::init()中天生的
场景初始化
我们向HelloWorld场景添加东西之前,必要先调用基类Scene类的初始化函数,然后得到visibleSize和origin备用 - <code>bool HelloWorld::init()
- {
- //////////////////////////////
- // 1. super init first
- if ( !Scene::init() )
- {
- return false;
- }
- auto visibleSize = Director::getInstance()->getVisibleSize();
- Vec2 origin = Director::getInstance()->getVisibleOrigin();
-
- ...
- }</code>
关闭按钮的天生
相干代码如下 - <code>bool HelloWorld::init()
- {
- ...
-
- /////////////////////////////
- // 2. add a menu item with "X" image, which is clicked to quit the program
- // you may modify it.
- // add a "close" icon to exit the progress. it's an autorelease object
- auto closeItem = MenuItemImage::create(
- "CloseNormal.png",
- "CloseSelected.png",
- CC_CALLBACK_1(HelloWorld::menuCloseCallback, this));
- if (closeItem == nullptr ||
- closeItem->getContentSize().width <= 0 ||
- closeItem->getContentSize().height <= 0)
- {
- problemLoading("'CloseNormal.png' and 'CloseSelected.png'");
- }
- else
- {
- float x = origin.x + visibleSize.width - closeItem->getContentSize().width/2;
- float y = origin.y + closeItem->getContentSize().height/2;
- closeItem->setPosition(Vec2(x,y));
- }
- // create menu, it's an autorelease object
- auto menu = Menu::create(closeItem, NULL);
- menu->setPosition(Vec2::ZERO);
- this->addChild(menu, 1);
-
- ...
- }</code>
cocos里许多对象在天生的时间都会使用create这个静态工厂方法,我们创建图片精灵的时间就用到了auto mySprite = Sprite::create("xxxxxx.png"),HelloWorld这个场景也不例外
MenuItemImage的create方法传入默认状态的close按钮的图片、点击状态下的close按钮的图片以及一个回调,回调指的是程序对按钮被按下这个变乱做出的相应,看不懂没关系,照着写就好 - <code>auto closeItem = MenuItemImage::create(
- "CloseNormal.png",
- "CloseSelected.png",
- CC_CALLBACK_1(HelloWorld::menuCloseCallback, this));</code>
然后就是计算出x和y的值,也就是右下角的按钮的坐标,getContentSize()得到对象的尺寸,最后使用setPosition设置按钮的坐标 - <code>if (closeItem == nullptr ||
- closeItem->getContentSize().width <= 0 ||
- closeItem->getContentSize().height <= 0)
- {
- problemLoading("'CloseNormal.png' and 'CloseSelected.png'");
- }
- else
- {
- float x = origin.x + visibleSize.width - closeItem->getContentSize().width/2;
- float y = origin.y + closeItem->getContentSize().height/2;
- closeItem->setPosition(Vec2(x,y));
- }</code>
但是按钮是不可以直接添加到场景中的,按钮必要依赖菜单,也就是Menu对象
我们创建一个包罗了closeItem的菜单,并设置坐标为(0,0),最后才气使用addChild将菜单添加到场景中 - <code>// create menu, it's an autorelease object
- auto menu = Menu::create(closeItem, NULL);
- menu->setPosition(Vec2::ZERO);
- this->addChild(menu, 1); </code>
字体的天生- <code>bool HelloWorld::init()
- {
- ...
-
- auto label = Label::createWithTTF("Hello World", "fonts/Marker Felt.ttf", 24);
- //Label::createWithTTF(表现的字符串,字体,字体大小);
- if (label == nullptr)
- {
- problemLoading("'fonts/Marker Felt.ttf'");
- }
- else
- {
- // position the label on the center of the screen
- label->setPosition(Vec2(origin.x + visibleSize.width/2,
- origin.y + visibleSize.height - label->getContentSize().height));
- // add the label as a child to this layer
- this->addChild(label, 1);
- }
-
- ...
- }</code>
这个也很好明白,Label::createWithTTF返回一个Label对象的指针,表现的字符串、字体和字体大小作为函数的参数,也是使用addChild添加到场景中,这里的1比0高一层,我们试着把文本的坐标设置到场景中央,修改成如下: - <code>auto label = Label::createWithTTF("Hello World", "fonts/Marker Felt.ttf", 24);
- label->setPosition(Vec2(origin.x + visibleSize.width/2,
- origin.y + visibleSize.height/2));
- this->addChild(label, 1);</code>
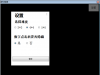
运行
文本是在logo上方的,验证了 z-order 值大的节点对象后绘制,值小的节点对象先绘制,先渲染的被压在后渲染的物体下面
精灵的天生- <code>bool HelloWorld::init()
- {
- ...
-
- auto sprite = Sprite::create("sinnosuke.png");
- if (sprite == nullptr)
- {
- problemLoading("'HelloWorld.png'");
- }
- else
- {
- // position the sprite on the center of the screen
- sprite->setPosition(Vec2(visibleSize.width/2 + origin.x, visibleSize.height/2 + origin.y));
- // Vec2(visibleSize.width/4 + origin.x, visibleSize.height/2 + origin.y)
- // add the sprite as a child to this layer
- this->addChild(sprite, 0);
- }
-
- ...
- }</code>
更简单了,使用一张图片天生一个精灵,同样也是加到场景中,最后要记得return true
深入探索HelloWorld场景
场景入口
起首,游戏场景的入口是导演类的runWithScene,打开AppDelegate.cpp,找到AppDelegate::applicationDidFinishLaunching()函数,可以看到: - <code>Copybool AppDelegate::applicationDidFinishLaunching() {
- // initialize director
- auto director = Director::getInstance();
-
- ...
-
- // create a scene. it's an autorelease object
- auto scene = HelloWorld::createScene();
- // run
- director->runWithScene(scene);
- return true;
- }</code>
Director类是一个单例类,使用getInstance可以得到它的实例,(单例模式包管体系中应用该模式的类一个类只有一个对象实例)我们必要Director实例来运行运行HelloWorld场景(通过runWithScene),并让HelloWorld以及HelloWorld的子节点工作
Node类
Node类是HelloWorld场景里我们使用的大部分类的基类(着实Scene类也是一个Node)
游戏世界中的对象实际上大部分都是Node,就像我们一开始提到的,Node和Node通过父子关系联系起来,形成一棵树,父节点使用addChild将子节点加到本身管理的子节点队列中,游戏运行的时间,导演Director就会遍历这些Node让他们举行工作
比如我们的HelloWorld场景:HelloWorld场景是根节点,精灵sprite,文本label,菜单menu是HelloWorld的子节点,按钮closeItem是菜单menu的子节点
Ref类
Ref类是用于引用计数的类,负责对象的引用计数,Ref类是Node类的基类,也就是说全部的Node都是使用cocos2dx的引用计数内存管理体系举行内存管理的,这也是为什么我们天生对象不是用new和delete,而是用create天生对象的原因
简单来说,引用计数法的理论是,当对象被引用的时间,对象的引用计数会+1,取消引用的时间就-1,当计数为0的时间就将对象销毁,感爱好可以相识一下智能指针和RAII
create
这个函数我们可以以为它是一个工厂,这个工厂把我们天生对象之前必要做的工作先做好了,在文章到达最开头有这样一段代码 - <code>Scene* HelloWorld::createScene()
- {
- return HelloWorld::create();
- }</code>
然后HelloWorldScene.h是这样的 - <code>#ifndef __HELLOWORLD_SCENE_H__
- #define __HELLOWORLD_SCENE_H__
- #include "cocos2d.h"
- class HelloWorld : public cocos2d::Scene
- {
- public:
- static cocos2d::Scene* createScene();
- virtual bool init();
-
- void menuCloseCallback(cocos2d::Ref* pSender);
-
- CREATE_FUNC(HelloWorld);
- };
- #endif</code>
为什么没有看到create函数,我们看CREATE_FUNC - <code>#define CREATE_FUNC(__TYPE__) \
- static __TYPE__* create() \
- { \
- __TYPE__ *pRet = new(std::nothrow) __TYPE__(); \
- if (pRet && pRet->init()) \
- { \
- pRet->autorelease(); \
- return pRet; \
- } \
- else \
- { \
- delete pRet; \
- pRet = nullptr; \
- return nullptr; \
- } \
- }</code>
可以看出来,CREATE_FUNC是一个可以让你偷懒不消手动编写create函数的宏
当然有的类必要客制化create,比如说Sprite的create - <code>CopySprite* Sprite::create()
- {
- Sprite *sprite = new (std::nothrow) Sprite();
- if (sprite && sprite->init())
- {
- sprite->autorelease();
- return sprite;
- }
- CC_SAFE_DELETE(sprite);
- return nullptr;
- }</code>
create里举行了什么操作呢?
- 使用
new天生对象
- 使用
init初始化对象
- 使用
autorelease将这个Ref类交给引用计数体系管理内存
看到这个init我们是不是想到了什么,HelloWorld场景的布局就是在init中实现的,而init由create调用,也就是说,在HelloWorld举行create的时间就已经将文本,按钮,精灵等物件创建并参加到场景中,而这些物件也是通过create创建的,也就是说,场景创建的时间会调用全部物件的init
autorelease是Ref类的方法,检察一下它的定义 - <code>CopyRef* Ref::autorelease()
- {
- PoolManager::getInstance()->getCurrentPool()->addObject(this);
- return this;
- }</code>
又看到了getInstance,分析PoolManager也是一个单例类,这段代码的意思很明显,将Ref参加到当前内存池中管理
我们在后续的开辟中常常必要客制化create,只要我们的create能满意上面三个功能即可
来源:https://www.cnblogs.com/zhxmdefj/p/11689693.html | 


 提升卡
提升卡 置顶卡
置顶卡 沉默卡
沉默卡 喧嚣卡
喧嚣卡 变色卡
变色卡 千斤顶
千斤顶 显身卡
显身卡